If you’re diving into the world of custom printing, DTF gangsheet builder tips are essential for maximizing your production efficiency. Utilizing Direct-to-Film (DTF) printing effectively not only entails crafting vibrant transfers but also smartly managing your gang sheets. By understanding key strategies in gang sheet layout and print workflow optimization, you can significantly reduce material waste and enhance print quality. Having the right design software for DTF and knowing the correct heat press settings can further streamline your entire printing process. Let’s explore how these tips can elevate your DTF printing experience, ensuring stunning results every time.
When it comes to fabric printing, mastering the art of gangsheet creation is crucial for success. These gang sheets, which are oversized layouts that consolidate multiple designs for efficient printing, can dramatically improve your workflow. By effectively preparing your files and optimizing your layout, you’ll achieve better results while minimizing waste. Utilizing advanced design software and perfecting your heat application techniques are also paramount in this process. Explore these essential strategies to refine your approach and boost your production capabilities in the thriving field of direct-to-film transfers.
Mastering DTF Printing Techniques for Optimal Design
To truly harness the power of Direct-to-Film (DTF) printing, it’s essential to master the various techniques involved in the design process. Understanding the significance of resolution is paramount; a high resolution of at least 300 DPI ensures that your prints are sharp and vivid. This directly impacts the quality of your gang sheets, allowing designs to emerge cleanly on textiles, retaining color integrity and detail. Furthermore, engaging with color management techniques—such as utilizing the right ICC profiles—can further enhance the accuracy of colors, helping to match the output of your DTF printer with your design goals.
Additionally, leveraging vector graphics in design can dramatically benefit your workflow. Vector files allow you to resize images without losing quality, making them perfect for layouts that involve multiple designs on a single gangsheet. The flexibility of vectors, paired with a proper understanding of color adjustments and layering, lays the foundation for highly effective DTF printing. Ultimately, these techniques are not just about aesthetics; they ensure a smooth print workflow optimization, enabling you to produce top-tier prints consistently.
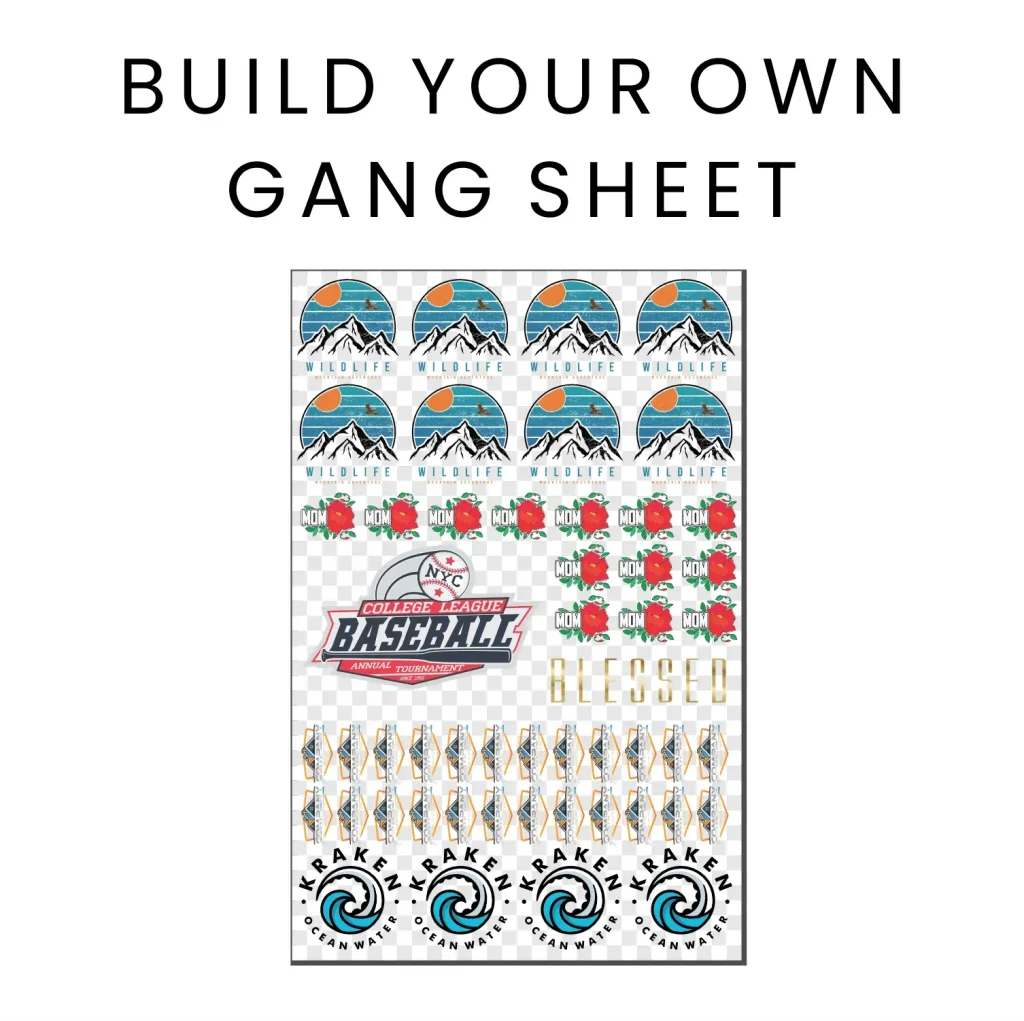
Effective Gangsheet Layout for Reduced Waste
Creating an effective gangsheet layout is crucial to maximizing material use in DTF printing while minimizing waste. One strategy is to group similar designs together by color and style. This not only helps in conserving ink but also simplifies the printing process, allowing for a more efficient setup on your printer. When designs are aligned in this way, recalibrating becomes less frequent, ensuring a smoother print run and better quality output. Additionally, keeping track of gang sheet layouts through design software can streamline this process, making adjustments easier to manage.
Another effective technique for gangsheet layout is the implementation of grid systems, which can aid in the efficient arrangement of multiple designs on one sheet. Grid layouts not only improve organization but also enhance accuracy when aligning different designs, significantly reducing the likelihood of misprints. By utilizing software tools like Adobe Illustrator or CorelDRAW, you can visualize spacing and placement more clearly, leading to superior gangsheet structure. This detailed planning can save time and material costs, making it a critical aspect of the print workflow optimization process.
Utilizing Software Tools for DTF Success
The use of software tools is vital in achieving precise and efficient gangsheet layouts in DTF printing. Leading graphic design software like Adobe Illustrator and CorelDRAW offer powerful features tailored to the needs of printers. These platforms provide robust tools for aligning, sizing, and formatting, which can help ensure that multiple design elements are correctly placed on a single sheet, reducing potential misalignment that leads to wasted materials. Moreover, using design software to track color profiles will help maintain consistent quality across all outputs.
Additionally, harnessing plugins and extensions within these design tools can foster better print readiness. Some software solutions come equipped with templates specifically designed for gang sheets, further simplifying the layout process. This allows for a seamless transition from design to production, ensuring that each print conforms accurately to your expectations. By choosing the right design software and mastering its functionalities, you can greatly enhance your DTF printing routine, ensuring high-quality outputs every time.
Testing and Iteration: Keys to Quality Assurance
Testing and iteration play a fundamental role in the DTF printing process, ensuring high quality and precision in production. By executing test prints before full production runs, you can identify any design issues, color discrepancies, or potential handling problems early on. This proactive approach saves time and resources, as it enables you to rectify any issues prior to committing to larger print jobs. Incorporating testing into your production workflow also fosters a continuous improvement mindset, where feedback from test prints shapes your design adjustments.
Furthermore, analyzing test print results helps refine both designs and transfer processes. Minor adjustments to settings, such as time, temperature, or pressure on the heat press, can significantly enhance adhesion quality. By methodically collecting feedback and iterating based on test results, you establish a quality assurance foundation that leads to impeccable final products. This cycle of continuous testing and iteration not only enhances print quality but also elevates your overall production process, contributing to greater operational efficiency.
Choosing the Right Materials for DTF Printing
Choosing the right materials for your DTF printing projects is a fundamental step in ensuring successful outcomes. Different fabrics require specific types of transfer sheets to achieve optimal adhesion and durability. It’s essential to research fabric compatibility with different DTF films and transfer papers to avoid common issues such as peeling or fading. Understanding these factors is critical to achieving long-lasting designs that withstand washing and normal wear-and-tear.
Investing in high-quality DTF films tailored to your specific use cases can enhance your printing results considerably. Films that boast excellent transfer properties will provide a smoother finish and better adherence to fabric, resulting in vibrant and durable prints. By consulting with suppliers and carefully selecting your materials based on fabric types and intended designs, you can set yourself up for success in the DTF printing landscape, ultimately improving both efficiency and quality of your outputs.
Optimizing Heat Press Settings for Superior Transfers
When it comes to DTF printing, optimizing heat press settings is crucial in achieving superior transfers. The correct application of heat and pressure directly affects the adhesion of the transfer to the fabric. Each fabric type will have its specific requirements for time, temperature, and pressure settings; hence, conducting thorough research or testing on different materials is vital. For instance, applying too much heat can scorch delicate fabrics, while insufficient pressure can lead to poor adhesion, diminishing the quality of the final product.
Regular maintenance of your heat press equipment is another critical element in ensuring consistent results. Keeping the heat press surfaces clean and frequently checking calibration can help prevent performance issues down the line. A well-maintained heat press not only improves transfer quality but also contributes to a smoother and more efficient print workflow. By prioritizing proper settings and maintenance, you significantly enhance your printing capabilities, allowing you to produce high-quality, durable transfers that meet or exceed customer expectations.
Frequently Asked Questions
What are the best practices for DTF gangsheet builder tips?
To optimize your DTF gangsheet builder, focus on effective file preparation, such as maintaining a resolution of 300 DPI and using vector files. Create efficient gangsheet layouts by grouping similar designs and utilizing grid layouts to maximize film usage.
How can software tools improve my DTF gangsheet layout?
Using design software like Adobe Illustrator or CorelDRAW can streamline your DTF gangsheet layout process. These tools facilitate precise alignment, sizing, and formatting, ensuring your designs are optimally arranged for printing.
What settings should I consider on my heat press for DTF printing?
For DTF printing, adjust your heat press settings for time, temperature, and pressure based on fabric type. Proper settings ensure adequate adhesion and quality, preventing issues like peeling and fading.
Why is testing important in the DTF print workflow optimization?
Testing prints are essential in DTF printing to identify issues related to design fidelity and color accuracy. Conducting tests before full production allows for adjustments, ensuring high-quality outputs and reducing flawed prints.
What materials should I choose for DTF printing to ensure quality transfers?
Select high-quality DTF films compatible with your chosen fabrics. Research material compatibility to avoid problems such as poor adhesion or fading, and always choose films known for their excellent transfer properties.
How can I improve my gangsheet layout for DTF printing?
Improving your gangsheet layout involves grouping similar designs, using grid layouts, and ensuring all elements are sized appropriately. This approach minimizes waste and ensures efficient use of DTF film during the printing process.
| Key Point | Description |
|---|---|
| Understanding the DTF Process | The DTF process involves printing designs onto a film with adhesive, which is then transferred to fabric with heat and pressure. |
| File Preparation | Ensure high-resolution (300 DPI) and use vector files to maintain quality and optimize designs for gang sheets. |
| Efficient Gangsheet Layout | Group similar designs and use grid layouts to maximize film use and reduce ink consumption. |
| Use of Software Tools | Utilize Adobe Illustrator or CorelDRAW for accurate design layout, managing multiple elements effectively. |
| Testing and Iteration | Conduct test prints to identify issues and refine designs before full production runs. |
| Transfer Process Optimization | Set correct heat press settings for time, temperature, and pressure based on fabric type. |
| Material Selection | Choose compatible transfer sheets and high-quality DTF films for effective adhesion on various fabrics. |
Summary
DTF gangsheet builder tips are essential for streamlining your workflow and achieving superior results in custom printing. By understanding the DTF process and focusing on critical areas such as file preparation, efficient gangsheet layout, and material selection, you can significantly enhance your productivity. Incorporating advanced software tools and conducting test prints will further ensure quality and reduce errors during production. Optimization of the transfer process is pivotal, requiring attention to detail in settings and regular equipment maintenance. With these actionable tips, you can improve your DTF printing outcomes, enabling you to stand out in the ever-evolving market of custom prints.